Lightning Photography Tutorial : How to take lightning pictures
NOTE: This article was originally written in the film era. Now that most people (including me) shoot on DSLRs, I've updated the information to include digital cameras. I've retained the older tips for anyone still shooting film.
Table of Contents
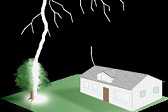
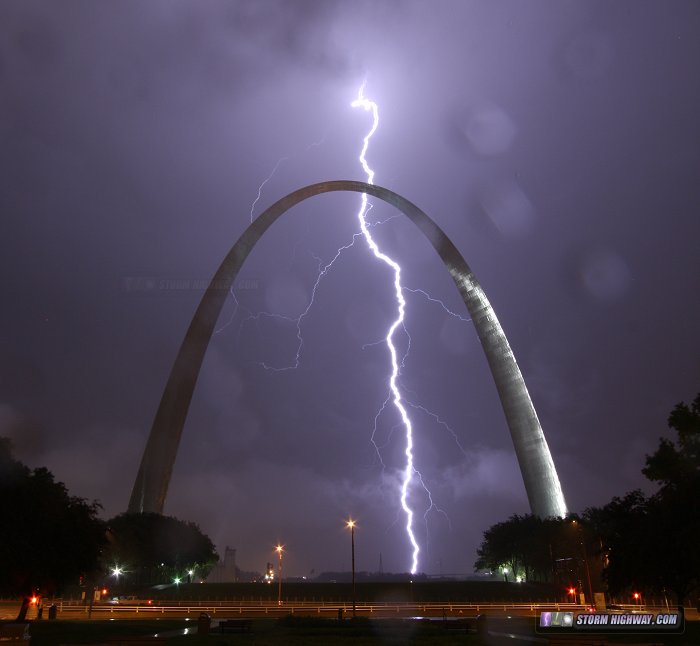
Above: A vivid close lightning strike at night. Camera settings: Canon XSi DSLR, 18-55mm lens; 18mm focal length; 20 second exposure, F13 aperture, 100 ISO
Introduction
 If you're looking for an exciting and rewarding hobby, taking pictures of thunderstorms just might fit the bill.
The photography aspect of catching lightning on film is extremely simple, and in most cases requires no skill or experience with a camera. But if you're interested in capturing a wide variety of lightning shots with different locations and subjects, photography is the least of the challenges.
 Thunderstorms are an elusive phenomenon that rarely cooperate with a photographer. Not only that, but most storms won't come to you - you'll have to go to them. And so lightning photography, as a pasttime, will require a bit of storm chasing - an adventurous hobby in itself that involves forecasting, tracking, and driving to active thunderstorms, among other things. Due to this challenging pursuit, both storm chasing and lightning photography, for those who are so inclined, will likely become a lifelong hobby that will provide years of enjoyment. Thunderstorms are an elusive phenomenon that rarely cooperate with a photographer. Not only that, but most storms won't come to you - you'll have to go to them. And so lightning photography, as a pasttime, will require a bit of storm chasing - an adventurous hobby in itself that involves forecasting, tracking, and driving to active thunderstorms, among other things. Due to this challenging pursuit, both storm chasing and lightning photography, for those who are so inclined, will likely become a lifelong hobby that will provide years of enjoyment.
 Right: Lightning photography on a stormy night. Right: Lightning photography on a stormy night.
It is worth mentioning the obvious that since lightning photography involves being outdoors in and around thunderstorms, it's an activity that can be dangerous if sensible safety considerations are not taken. But the participant who excercises common sense in the hobby will be just as safe as he or she would be collecting stamps.
This page will cover mainly the photographic aspects of catching lightning. A tutorial on storm chasing can get fairly deep, but we'll discuss some of the basics that will help you get started at the end of this article.
Cameras
In order to take photographs of lightning, you'll need to have a camera with a 'bulb' (time exposure) setting. This allows the shutter to be open for extended periods of time, a vital function for capturing lightning.
- Digital Cameras: Ideally, a DSLR with a 'bulb' shutter setting is the best for lightning. Some cheaper point-and-shoot digital cameras (without a 'bulb' setting) can be set on a fixed long exposure setting, such as 10, 20 or even 30 second exposure intervals. Check your camera's manual to see what the long exposure settings/maximum shutter speed times are. Ideally, an exposure time of at least 10 seconds is necessary for the best performance and versatility for lightning.
- Film Cameras: Many lightning photography veterans still prefer the look of film. Older model 35mm SLR (Single Lens Reflex) cameras with all-manual settings, such as the Pentax K1000 or Minolta SRT201, are relatively inexpensive (look on eBay) and work very well. These cameras are also more rugged and more resistant to the inevitable splashes of rain than expensive computerized cameras. Also, since your camera settings stay pretty much the same for every lightning photo session, all of the fancy automatic stuff isn't really necessary.
Cameras used regularly for lightning photography will have to endure harsh conditions and lots of abuse (especially moisture), so keep this in mind before dragging your high-end gear into a storm. (See the section on dealing with rain)
From the film era: Unless you've got a waterproof camera or proper protective gear, you're better off spending the $150-$200 on Ebay on a used manual SLR and lens that can take the heat, and won't be a big loss if it gets ruined. My old Pentax SLR has been dropped, rain-soaked, stressed, dirtied, shaken, baked in summer heat, frozen in winter cold, and taken years of abuse - but still catches lightning. All of the non-digital lightning photos on this site were taken with either the all-manual Pentax K1000 or the similar Minolta SRT201. Once again - your cameras will eventually get drenched a few times if you do this long enough - so plan accordingly.
Again, the Internet is one of the best places to find good deals on used, rugged camera equipment. I bought my Pentax K1000 body, a 28mm wide-angle lens, and a 75mm-205mm zoom lens on Ebay for under $200 total.
If your shutter is powered, bring extra batteries- long time exposures will drain the batteries quickly.
NOTE: Discussed later in this article is a method that you can employ to take lightning shots with any camera, even a disposable or 'instamatic'. Lenses
The lens you use is entirely up to you, but can vary depending on your location and subject. I personally like to use a wider lens - typically 18mm to 28mm, because it gives me more sky coverage without much distortion. A wider lens increases the chance that you will get a bolt to strike in the field of view. A telephoto lens can be useful for distant thunderstorms in areas with high visibilities (such as the desert Southwest and the central Plains regions in the USA). In the Appalachian and east coast areas of the US, terrain and trees tend to obscure distant lightning on the horizon, meaning that lightning channels won't be visible until they are close - in which case you'll want to use the wide-angle. Keep your telephoto lens on standby in case you get a photogenic distant storm. I have recently become fond of using a 50mm prime lens, which works great for storms at moderate distances.
It's best to avoid the use of filters (ND, UV, etc) when shooting lightning. Additional layers of glass can cause reflections and 'ghosting' of bright light sources like lightning. Tripod and Cable Release
 You will need a tripod to hold your camera steady during time exposures. Virtually any brand and type of tripod will work, though generally, the more expensive brands such as Bogen tend to last longer. But even a $20 tripod from Wal-Mart will get the job done.
You might also want to consider a small tripod or clamp mount that you can set up inside of your car, enabling you to photograph out of the window (see photo at right).
A cable release or shutter release is a small, flexible device that screws into a camera's shutter trigger (visible on the camera in the photo at right). In the case of a DSLR, cable releases are electrical switches with a cord that plugs onto a socket on the camera. A cable release allows you to open and close the shutter without touching/jarring the camera. Most cable releases have a locking device that lets you hold the shutter open for long periods of time hands-free. Camera and Exposure Settings; photo examples
It's hard to go wrong with an exposure of lightning. Aim the camera, hold open the shutter, and wait. If lightning strikes where you aimed, you got it! Usually you will go through 10 or 15 frames on the roll of film before actually catching a bolt, meaning that you won't actually have lightning in every picture on the roll (unless you're having a very good night). You might want to experiment with exposure settings for different scenes, but as a general rule, use the following:
- ASA (ISO): On digital cameras, use the 100 ISO setting for best results in most lightning situations.
- Rural Areas at Night: Focus at infinity, F-stop between F5.6 - F10. Distant lightning may require smaller F-stops. In rural areas with little or no ambient light, you can leave your shutter open indefinitely until a lightning bolt flashes in your frame.
 Nightime lightning over rural Illinois. Camera settings: Canon XSi DSLR, 18-55mm lens; 37mm focal length; 20 second exposure, F5.6 aperture, 100 ISO Nightime lightning over rural Illinois. Camera settings: Canon XSi DSLR, 18-55mm lens; 37mm focal length; 20 second exposure, F5.6 aperture, 100 ISO
- Close lightning at Night: Close lightning can easily overexpose a shot, especially if the bolt has many repeated return strokes (additional discharges of current through the same channel). If you expect close lightning, you will need to close your aperture down to prepare. F10 - F13 is usually sufficient, but occasionally even that will not be enough. Keep in mind that if you stop down like this, lightning strikes that are not close will be underexposed - so you should only use these settings when you are expecting a close strike or otherwise trying to get one on purpose (that is, not caring about missing the distant strikes).
 Close lightning strike in Texas. Camera settings: Canon T6i DSLR, 50mm prime lens; 5 second exposure, F10 aperture, 100 ISO Close lightning strike in Texas. Camera settings: Canon T6i DSLR, 50mm prime lens; 5 second exposure, F10 aperture, 100 ISO
- Urban Areas at Night: Focus at infinity, F-stop of F5.6 for a maximum exposure time of 6-10 seconds depending on the level of ambient light. Or, F-stop of F8 for 10 to 15 seconds. For best results, expose the scene as you would without lightning, and the lightning will take care of its own exposure when it flashes in the background. If you have a DSLR, do several test exposures of the ambient scene to see what works best. Remember to gradually close down the aperture (and lengthen exposure time) as the lightning gets closer to avoid overexposed bolts.
 Nightime lightning over Charleston, WV. Camera settings: Canon XSi DSLR, 18-55mm lens; 18mm focal length; 8 second exposure, F6.3 aperture, 100 ISO Nightime lightning over Charleston, WV. Camera settings: Canon XSi DSLR, 18-55mm lens; 18mm focal length; 8 second exposure, F6.3 aperture, 100 ISO
- Daytime Time-Exposure: Focus at Infinity, F-stop of F8-F22. Use 2 to 5 second exposure intervals depending on the level of daylight. This uses film up very fast, and generally has a low rate of return. You should only attempt this with the most intense lightning storms containing frequent strikes. Also, a bolt caught using daytime time exposures will only show up well if it is very close. Again, a DSLR is best for this because you never run out of film - however, your memory card will fill up fast!
 Daytime close lightning strikes, captured with short time exposures. Camera settings: Pentax K1000 SLR, 28mm prime lens; 3 second exposure, F22 aperture, Kodak 100 ASA print film Daytime close lightning strikes, captured with short time exposures. Camera settings: Pentax K1000 SLR, 28mm prime lens; 3 second exposure, F22 aperture, Kodak 100 ASA print film
- Daytime or Nighttime "Reaction" Exposure: This method can be used with any type of camera, not just an SLR. Aim your camera at the scene, keeping your finger on the shutter button. As soon as you see a flash, hit the shutter immediately. Most lightning discharges are made up of multiple, repeated return strokes. While your reaction will miss the first (and the only branched) stroke, you have a good chance of capturing one of the subsequent strokes. Furthermore, it is common for several separate cloud-to-ground strikes to occur in rapid succession, each triggered by the one before (see this video clip). If you react to the first one, you may very well catch one of the subsequent ones.
The advantage of this 'reaction' method is the short exposure time, allowing you to shoot lightning in bright daylight situations. While this works with any type of camera, an SLR certainly helps. Tripod your camera and use up to 1/4-second exposures triggered by your reaction to a flash. As with nighttime scenes, expose the scene as you would without lightning, and the lightning will take care of itself on the film. For instance, for a typical afternoon storm, use F8 with a shutter speed from 1/250 (bright sky) to 1/60 (very dark clouds).
 Lightning hitting a tower during the day, captured by manual reaction to the flash. Camera settings: Canon XSi DSLR, 18-55mm lens; 18mm focal length; 1/6th second exposure, F8 aperture, 100 ISO Lightning hitting a tower during the day, captured by manual reaction to the flash. Camera settings: Canon XSi DSLR, 18-55mm lens; 18mm focal length; 1/6th second exposure, F8 aperture, 100 ISO
- Lightning "Trigger" devices: Electronic "lightning trigger" devices have been around for a long time for both film and digital cameras. These perform the same function as the manual reaction method above, but usually much quicker and reliably than your reflexes can. Like the manual reaction method, these devices have to detect the beginning of a lightning flash and therefore will usually miss some or part of the discharge's early stages, for example the branching that occurs in the first few milliseconds of cloud-to-ground bolts.
Lightning triggers are most useful for bright daylight scenes where very short exposure times are necessary. At night or in dusk/dawn scenes where you can use long exposures, a lightning trigger device isn't very useful nor desireable. As such, I have never employed one myself, but some of my colleagues have captured some nice daytime images with them.
- Distant lightning: In flat terrain, lightning more than 20 miles away can be photographed if clear skies allow. Because the light from distant lightning must travel through many miles of atmosphere, it is much more faint. To compensate, your aperture needs to be open wide (less than F5.6). You may even need to increase the ISO setting on your camera (try 400 to 800 ISO). Lightning's color will be increasingly orange/red the farther away it is, in the same way the setting sun is affected by its light passing through great lengths of the atmosphere.
 Lightning photographed from 70+ miles away. Camera settings: Canon XSi DSLR, 70-300mm lens; 120mm focal length; 12 second exposure, F5.6 aperture, 1600 ISO Lightning photographed from 70+ miles away. Camera settings: Canon XSi DSLR, 70-300mm lens; 120mm focal length; 12 second exposure, F5.6 aperture, 1600 ISO
Aperture (F-Stop) Settings
We covered most of the aprture subject above, but here are some additional points to consider. Since the brightness of lightning, for all intents and purposes, is the same in any situation (day, night, urban, or rural), you will always want to keep your aperture between F5.6 and F11, regardless of any ambient light levels. (Again, higher F-Stops may be needed for close lightning, smaller for distant lightning). Closing the aperture beyond F11 for "normal" storm conditions will allow for longer exposure times, but you will also be restricting the amount of light exposed by the lightning itself, which will result in thinner, underexposed bolts. Opening the aperture beyond F5.6 in most cases will overexpose or 'white out' the lightning channels (and even the clouds), resulting in wide, bright white columns of light enshrouding the bolts. You will find that some bolts are more intense than others - meaning that a strike may still overexpose at F8 or underexpose at F5.6. It is nearly impossible, however, to accurately predict how bright each strike will be, so just keep to the known averages. Not every bolt will come out perfectly.
If you're using a DSLR, always view every bolt you catch on the LCD to check its exposure so you can adjust as needed. Focusing
You'll always want your focus set to infinity for lightning photography. If your lens has an 'infinity stop' on the focus ring, use that - otherwise you will need to autofocus on a distant point, then switch autofocus off. Do a test exposure on your DSLR, then zoom in on the shot on the LCD to check the focus. At night in rural areas, use streetlights or distant car headlights to set the focus. Again, set lens on autofocus, get a focus lock, then switch back to manual focus. Make sure you re-focus the lens if you happen to bump it!
Sometimes autofocus may have a difficult time locking in if you're in a dark rural area with very distant streetlights (or none at all). You can use the 'live view' function (if your camera has one) to zoom in on a distant point of light, set the lens to manual focus, and use the LCD to manually gauge the focus. This is quite difficult to get right, however. You can sometimes get better results by walking about a quarter mile or so from your car, and using its taillights to get an autofocus lock. The farther away your car is, the better, especially the more narrow your lens is. Wide-angle lenses are generally easier to set to infinity this way.
 Don't let this happen to you! Don't let this happen to you!
Again, if you're using a DSLR, always do periodic 'spot checks' of bolts on the LCD (fully zoomed in) to ensure you have the focus right. You don't want to discover a bad focus (like the one above) after shooting the entire storm! Film
The general consensus among most lightning photographers is 100 speed slide film, such as FujiChrome Sensia or Provia. All types of film will catch lightning, but slide film yields the finest detail and the highest picture quality. For years I used standard 100 speed print film because of its low cost, but eventually switched to slide film for its remarkable quality. Lightning bolts appear clearer, crisper, brighter and more detailed on a slide. Slides also tend to pick up more cloud detail and show deeper and more appealing colors.
The examples below demonstrate the difference between slide and print film for two similar cloud-to-ground lightning flashes. The first photo was taken on Kodak 100 ASA print film, the second on FujiChrome Sensia 100 (Click on each photo to enlarge). The differences are very apparent:
 
Slide film is generally about four times more expensive than print film, but well worth the extra cost. A good photo of lightning will be valuable to you, so you'll want it to be on the best quality film possible.
As a rule, the slower the film speed, the longer you can leave your shutter open in areas with more ambient light (such as cities). Faster film speeds will work, but the images will be grainier.
Have extra film ready. Set aside a few rolls just in case a unexpected storm catches you off guard. You'll likely use two or three rolls quickly during a storm, and nothing is more frustrating than running out of film during a spectacular lightning show. I usually keep 4 rolls with me in a cooler at all times, just to be ready. Shooting in RAW; overexposure recovery
If you're using a DSLR, you should always shoot in RAW mode (or RAW+JPEG). This gives you a limited ability to recover overexposed bolts. Here's an example:
Original image shot at F5.6 (F8 should have been used here):
 click to enlarge click to enlarge
Recovered in RAW editor:
 click to enlarge click to enlarge
Again, RAW recovery is limited, and the more severe the overexposure, the less quality you'll be able to pull out of the image. Severely overexposed bolts will tend to be too 'fat' and have unsightly haloing. The example above is a little past the point of being a usable image (to me). It's always better to get the exposure right if you can. If you're just a little over/under exposed, the RAW will give you the ability to 'tweak' it just enough to look good. Multiple Bolts
At night, you can leave the shutter open for long periods of time to get numerous lightning strikes on the same frame. In this case, use an aperture of F8 to limit cloud overexposure.
 Long nighttime time exposure of many distant lightning strikes in Texas. Camera settings: Pentax K1000 SLR, 28mm prime lens; 10 minute exposure, F8 aperture, Fujichrome 100 ASA slide film Long nighttime time exposure of many distant lightning strikes in Texas. Camera settings: Pentax K1000 SLR, 28mm prime lens; 10 minute exposure, F8 aperture, Fujichrome 100 ASA slide film
However, most cloud-to-ground lightning discharges involve clusters of two or more separate bolts (see photo at right) that occur almost simultaneously in extremely rapid succession, so you don't really need to do long exposures to get multiple bolts in your picture. In fact, with most storms, a solo cloud-to-ground bolt is somewhat rare. Composition
 In your lightning shot, you'll always want to include the horizon and part of the ground in your photo, rather than just pointing your camera up at the sky. Aside from lightning in urban scenes, use of the 'rule or thirds' is not always desireable, since the ground will usually be totally black in the exposure. You'll want more of a 4/5ths or 5/6ths sky, 1/6th ground configuration to give you more of a 'canvas' for the lightning to pose on.
Breaking the Rules - These suggestions are only general guidelines for lightning photos. When the time and place is right, you might want to 'break the rules'. For instance, in some cases, there will be an object across the sky that will add to a photo rather than detract from it, such as a building or a bridge.
You might want to get creative and shoot a predominant object in the foreground with lightning secondarily in the background. Rather than always avoiding car headlights, there are places that you can incorporate them. Use your imagination - the sky is the limit, literally!
 Interstate 77 traffic and distant lightning in West Virginia. Camera settings: Pentax K1000 SLR, 28mm prime lens; 2 minute exposure, F8 aperture, Fujichrome 100 ASA slide film Interstate 77 traffic and distant lightning in West Virginia. Camera settings: Pentax K1000 SLR, 28mm prime lens; 2 minute exposure, F8 aperture, Fujichrome 100 ASA slide film
Dealing with rain
You will find that rain is quite possibly the most challenging aspect of shooting lightning photos. The thing about lightning is that it is created by thunderstorms - and thunderstorms produce LOTS of rain! During a thunderstorm, rain comes at you from all directions - down from the sky, horizontally with the wind, and even up from the ground (spray)! A soaked camera can stop working temporarily, be damaged or even destroyed by rain. But it's rain on the lens that is the bane of a lightning photographer - even a single raindrop on the glass can ruin a photo. Occasionally, a well-placed raindrop can be cloned out in Photoshop - but more often than not this isn't possible.

The following are some tricks I've employed to help manage the rain problem. All this being said, you're going to have to accept that even with the best preparations, rain can't be eliminated completely. It's a part of shooting lightning as much as the lightning itself. In many instances, rain can be so bad that it's not worth continuing the shoot - I've had to retreat on many good storms because there was no way to keep rain from instantly covering the lens.
- Shoot from inside of your vehicle: If the wind is relatively light (even a lightly rocking vehicle will blur photos), your car can make a good rain shelter. There are lots of various clamps and suction cup mounts you can buy to allow a complete in-vehicle shooting platform. At worst, you can set up a smaller tripod inside of the car, extending the legs until they're all resting on something firm (two of the legs on the floor and one on the armrest, for example). In short order, some vehicles might allow you to simply wedge your collapsed tripod in between the door and the seat (place the tripod next to the seat with the door open, then close the door).
When shooting from your car, the farther back from the window you can get, the more protection you'll have from rain. This, of course, will limit your field of view to narrower lenses unless you just want to crop the windowframe out in Photoshop. A wide-angle lens will need to be much more exposed to rain in order to avoid getting the windowframe in the picture.
- Wrap the camera in clear plastic: I have used one-gallon ziplock bags (top-down) to cover a camera for storms, poking a hole just big enough to allow the lens to stick out while maintaining a good seal around it. Clear plastic is cheap and pretty easy to work with, and you can still see the screen and manipulate most of the controls. These bags are a one-use solution, I've found you really can't get a good enough seal around the lens a second time. I keep a box of these in my trunk at all times.
- Keep an ample supply of lens wipes: Photographers who baby their lenses aren't going to like this part - but in a storm, you're going to be constantly in need of removing the raindrops off of the front element unless you want a photo that looks like it was taken through broken glass. This is a constant, aggravating battle. During most of the better storms I've photographed, I've had to remove drops quickly in between every shot. Again, one drop can really sabotage a good photo, so you can't escape this part. I have settled on using paper towels - yes, I know this raises the eyebrows of the owners of expensive glass - but shoot a few storms, and you'll realize why I do it. I lightly blot the front element with a balled-up paper towel, just enough to quickly pick away the droplets. I've never suffered a scratch or any other ill effects from doing this. If you insist on using a lens cloth, bring at least two dozen of them. You'll go through one of them every five frames.
- Lens hoods: These are not as practical as one might first assume. With a wide-angle lens, it's hard to have a hood provide much meaningful protection without encroaching into the photo frame. Hoods protect longer lenses better, but it's a bit of a paradox - if you're shooting with a long lens, you're probably going to either be shooting more distant lightning or be shooting from a location where you can simply move farther back from the window/overhang you're set up under. And with the fine spray common in thunderstorm rainfall, small droplets will still make their way to the front lens element no matter what you do - and a hood will make removing those that much harder.
- Umbrellas: If you are shooting from a protected location (under an awning, overpass or in a parking garage for example), an umbrella can provide an extra shield from wind-blown rain. I use a large golf umbrella often, since I can reposition it to block the sideways-blown rain as the wind inevitably shifts around during a storm. When shooting from my car, I have been able to temporarily bungee-cord the umbrella to the doorframe, creating a sort of awning that can give me a little more rain-protected space to work with.
- Avoid nearby bright lights: Raindrops are very efficient at capturing light from bright streetlights or vehicle headlights nearby - even those outside of the camera's view - making any droplets on the lens stand out that much more. If you can block any close-by light sources from the side (with your hand or your body), you can mitigate this effect and possibly get away with a droplet or two on the lens during a photo without too much ill effect (as long as the lightning channel doesn't cross the droplet in the frame).
Shooting locations
Often, a frustrating and time-consuming part of lightning photography is simply finding a good place to take pictures. You will usually need to 'scout out' and make notes of good places to shoot - preferrably during the day before the storms arrive. Ideally, a good setup location needs:
 - An unbroken view of the sky. Unsightly power lines and tree branches across your photo usually will detract from the drama of the image (see photo at right). It's true that some photographers have incorporated power lines into their photos on purpose with very good results. But as a general rule, it's best to avoid any wires across your frame. Keep in mind that power lines are hard to see at night, and usually won't show up in your picture until you get your film developed. In most parts of the country, vantage points free of these obstructions are very hard to find.
 - Low ambient light levels close to the camera. Streetlights and car headlights will force you to either cut your exposures short or accept strong glares on your image (see photo at right). Keep this in mind when choosing a location. (This rule can be broken for special situations where you want to be creative).
 - Protection from the elements. We already covered this above - rain and lightning should be a concern when considering a setup location. Lightning is an obvious threat to your safety, while raindrops on your camera lens will reflect/refract light and ruin a good photo. Parking garages, highway underpasses, and large buildings can keep you and your camera safe from both. Setting up inside your car may be an option (see previous section), but is one that provides less shelter from rain. Heavy rain or wind will end a lightning photo session, even at the best locations, due to fine mist and spray that forms as a result of rain splashing onto the ground. If your dedication levels are high, you can carry a rag out with you to wipe the lens dry every 15 seconds or so.
- Safe Parking - The best view in town is no good if there's nowhere to park legally and safely.
Stacking multiple images
If you do not move your camera during a storm and capture multiple individual shots with lightning, you can merge those into a single image using digital stacking. Stacking simulates the result of a single long exposure. For example, these eight individual images were shot during the same storm, and the camera remained in exactly the same position:

Using Photoshop, the images were stacked together to result in this final image:

To stack images in Photoshop, follow these basic steps:
- Open the first image
- Open the Layers toolbar (if it is not already open)
- If the image layer is a background, right-click on it in the Layers window and choose "Promote to layer"
- Open the second image.
- Select the entire second image (CTRL-A) and copy it to the clipboard (CTRL-C)
- Paste the second image onto the first image (Photoshop should create a new layer for the second image)
- Repeat steps 4-6 for each image you want to stack. You should end up with a single image window with a layer for each individual image.
- Highlight (select) all of the layers in the Layer toolbar.
- From the main menu, go to Layer > Smart Objects > Convert to Smart Object. All of the layers will be grouped into one Smart Object layer.
- From the main menu, go to Layer > Smart Objects > Stack Mode > Maximum
Not all image sequences will stack well. As a rule of thumb, make sure the white balance, color and brightness of the sky are identical across all images - even a slight color difference from one image to the next will result in a bad blend in the final image. Because of this, don't try and stack too many images together. If the final stack doesn't look right, try "undoing" to before the Smart object conversion, remove some of the individual image layers, and try re-stacking. You can also try to color-match the images by doing RGB/HSL adjustments to each individual layer, but this is very tedious and in my experience usually doesn't work well enough for the work involved. Money-Saving Film Tips (from the film era)
Most of the time, you'll shoot a roll or two of film, but only catch a lightning bolt on three or four frames. If you're using standard print film for your lightning shots, you stand to save a substantial sum when you get the roll developed. Don't just drop the film off as you would normally - give instructions to the lab to make prints for only the negative frames that contain lightning. If you don't, you'll have to pay for all of the printed frames on the roll that are just the same scene without the lightning. Most photo labs charge about $2 for negative processing and 25 cents for each print. So, if you have a 24 exposure roll of film with one lightning photo on it, you only need to pay for the processing and the one print- saving, in many cases, up to $10.
If you shoot slide film, this trick isn't applicable, since most labs don't include prints when processing a roll of slides. Finding Storms
Storm chasing can be very simple or highly involved, depending on your level of interest. You don't need a meteorology degree and a lot of fancy equipment. Here are some tips that will help you get on the road and catch a storm:
- Watch the weather forecasts and use available data, such as radar: Keeping an eye on the forecasts will allow you to plan a night of chasing ahead of time, as opposed to jumping in the car as soon as you see a storm approaching. In most cases, if you can hear thunder, you only have about 5 to 15 minutes to set your camera up before the photogenic lightning arrives. If you monitor weather data and radar on a potentially stormy night, you will have more time to position yourself in front of an active storm. An abundance of this type of weather information is available on the internet, you can use this page to get started.
- If storms look like they may pass you by, and if you feel adventurous, do a little storm chasing. Simply put, when storms approach, watch the latest radar animations ('loops'), pick the best-looking cell, get a bearing on where your storm is heading, and drive to it! Try to pick an intercept location that you know has a safe and photogenic spot to set up your cameras. As we mentioned above, this is easier if you've done some scouting and have some spots picked out in advance. Usually the best photo opportunities are just outside of a cell rather than deep inside it, so you don't want to just drive straight into your storm. Remember, the less rain, the better. If you're approaching the storm and it starts giving you some good lightning, stop right then and take your shots as quickly as you can. Storms tend to not give you many good opportunities, so take what you can get if it's putting on a show for you.
- Use NOAA Weather Radio: Keep a scanner or weather radio in your vehicle. The National Weather Service will provide periodic short-term updates, watches and warnings on developing situations in your area, which can be helpful after you're on the road.
- Consider using a nowcaster: If you can't afford a mobile Internet connection, a nowcaster may be your next option. A nowcaster is simply someone (usually a friend or family member) who is monitoring weather data for you at their home computer, and can pass this information to you via telephone while you're on the road. For seasoned storm chasers, this is invaluable, as conditions can change rapidly by the minute. Having someone describe the current radar images to you in real-time over the phone often means the difference between catching a storm and going home empty-handed.
- Use your AM Radio: Lightning produces radio waves called sferics that are audible on any AM radio. Tune to an unused channel, and listen for sudden pops and crackles that indicate lightning is occuring in your area.
- Drive slow: Especially in rain. Highway slickness is deceptive.
- Storm Chasing & Photography gear: Carry the following items with you any time you go out on a storm-shooting chase:
- Flashlight
- Insect Repellent
- At least $20 cash for emergencies
- Cell Phone
- Dry Clothes (you will almost always get drenched)
- Snacks and beverages (for long waits)
Final Thoughts
Plan ahead and be patient! Always be ready for a storm- most of them will come up unexpectedly. Have your camera ready and film loaded. Figure out ahead of time where you can safely set up your camera.
There is no guarantee you will get a good picture every time. But, if you are persistent you will be successful.
 About the Author: Dan Robinson has been a storm chaser, photographer and cameraman for 34 years. His career has involved traveling around the country covering the most extreme weather on the planet including tornadoes, hurricanes, lightning, floods and winter storms. Dan has been extensively published in newspapers, magazines, web articles and more, and has both supplied footage for and appeared in numerous television productions and newscasts. He has also been involved in the research community, providing material for published scientific journal papers on tornadoes and lightning. |
GO: Home | Storm Chase Logs | Photography | Extreme Weather Library | Stock Footage | Blog
Featured Weather Library Article:
|